- SITS:Vision v8.7.0
- Uniface v9.6.03
- Microsoft Windows 7
- Microsoft SQL Server 2012 (SP1) - 11.0.3128.0
What?
"Quick" may not be the right word, so this is a somewhat summarized article on how to get data out of SITS, up to running the monitors and populating an OUTPUT table in the SITS database. Note that this does not include steps thereafter in the Staging or Target destination which will be specific to your business requirements.
Why?
If you're developing in SITS, and you use the client, the first time(s) you do this, the task is rather daunting. Having done it a few times and run through a few, I thought I'd note this down to remind me if I ever work for a company using SITS:Vision again.
How?
For demonstration purposes, I'm going to create a table update process (TUP) based around a change in the course application details. Some of the screenshots are censored for confidentiality but nothing relating to the instructions will be hidden.
We will run all three monitors (DOT, EOT, TOT) last and after setting up all the pre-requisites in SITS first:
- What changes will trigger the event?
- Find the screen you know contains the field to monitor, in this example, it will be the Application Clearance and Decision Entry (ACD) screen.
- Put the cursor in the field and press F1, this will give you the name of the field, its entity and dictionary. My example below will use the Decision/date and Response/date fields (rather than the CAP_IDRC).
- This demo will use the key fields from the Course Application (CAP) entity/table.
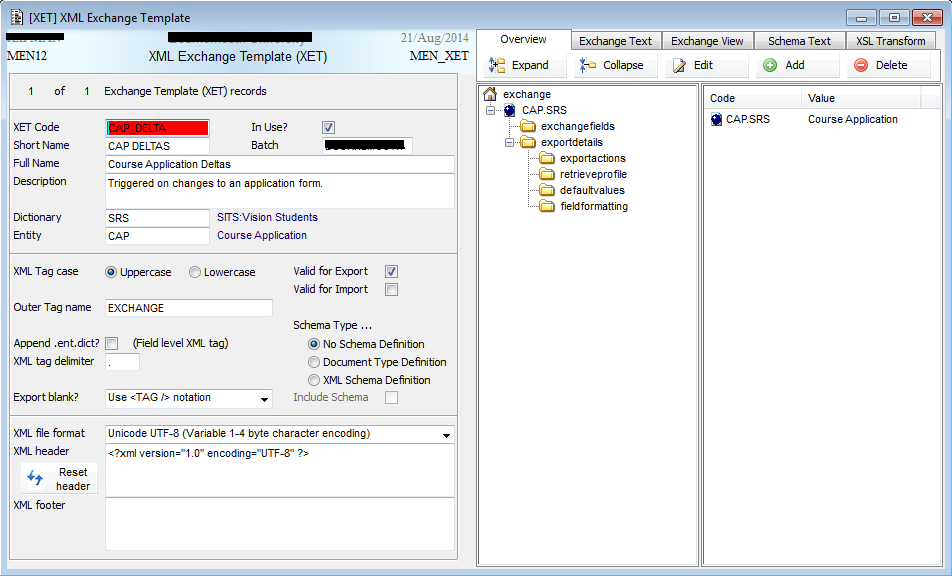
- Create the XML Exchange Template (XET)
The XET will give me an idea of what the output will be for my staging process as well as seeing what fields I will be bringing through.- Run XET from the menu system and you should be presented with a cleared/new record
- Complete the form noting the name of your XET Code and then selecting the appropriate dictionary and entity; here we are using SRS as the dictionary and CAP as the entity. (If your change spans different entities, just use the parent/root entity, usually STU)
- XML is case sensitive so bear this in mind, tick the "Valid for Export" and decide whether blanks are included in the output or not.
- Select and right-click on the entity and select "Edit ... exchange fields" (in this case "Edit CAP exchange fields")
- Under "Exchange Fields", tick which boxes to output
- Under "Export format", specify any code lookups (eg. for CAP_STAC, we want the code and the lookup value/name and then something to display if the lookup fails: &G[STA.SRS:·<·<STA_CODE.STA·>·>|·<·<STA_NAME.STA·>·>]&ABLANK="*InvalidCode*|*InvalidCode*", will output something like <cap_stac>A|Applicant</cap_stac>)
- Click on "Apply"
- Include any additional entities as sub-entities under the parent one (not used in this demo) and repeat the steps above to select the exchange fields.
- Check/ensure the "In Use?" is ticked.
- Store/save your XET
- Setting up the Stu-Talk Message Group (SMG)
This should be done before continuing as the remaining screens will refer to this and allow you to specify the related SMG- Run SMG from the menu system
- Enter a CODE (in our demo "CAPCHG")
- Enter a Short Name (unsure of how this is used)
- Enter a descriptive "Full Name" as it will automatically display alongside any reference to the Message Group in the remaining screens.
- Check/ensure the "In Use?" is ticked.
- Store/save your SMG
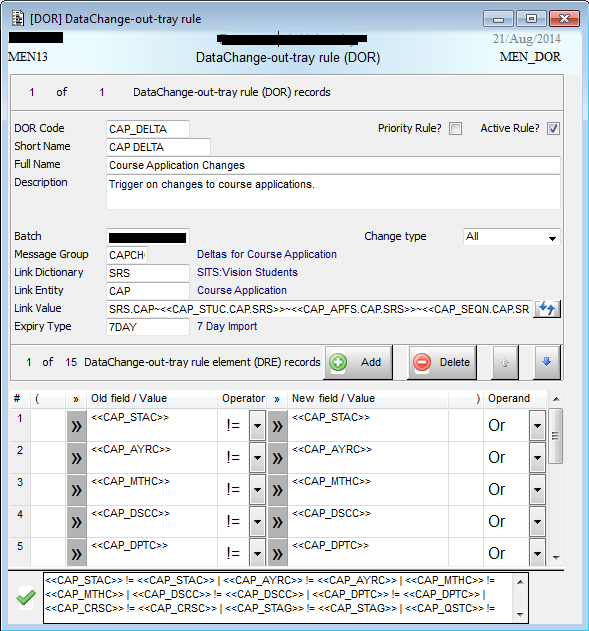
- Setting up the DataChange Out Rule (DOR)
This is where we can link to other entities and create the rules on changes to the relevant fields- Run DOR from the menu system
- Enter a DOR code (we kept this the same as the the XET and EOR codes)
- Specify the Message Group that the monitors will run.
- In our demo, the link value uses all three primary keys of the CAP entity. They can be separated by double hashes/pound signs or a single tilda with the keys enclosed by double chevrons.
- Add the DataChange-out-tray Rule Element (DRE) records by clicking on the "Add" button
- Use brackets/parenthesis if you need to
- Enter the field to monitor under "Old field/Value" enclosed by double chevrons
- Enter the same field to monitor under "New field/Value" enclosed by double chevrons
- The final statement will be something like <<CAP_STAC>> != <<CAP_STAC>>
- Use the Operand "OR" or "AND" to add further fields, in our demo we want all the key fields:
- Store/save your DOR
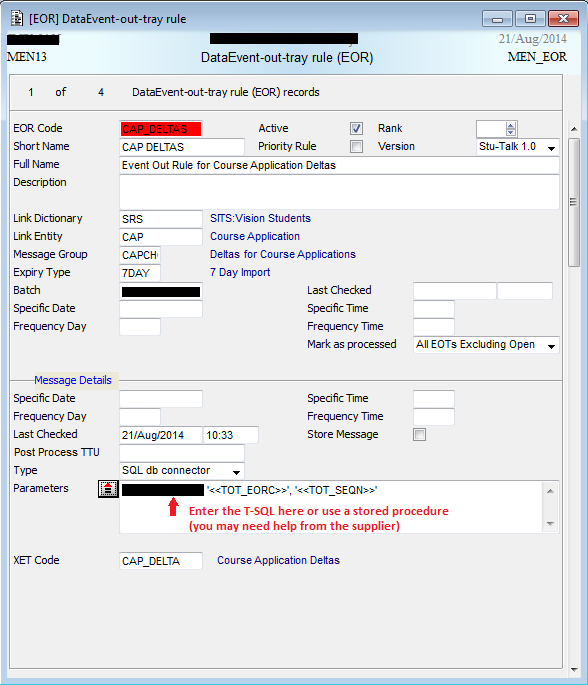
- Setting up the DataEvent-Out-Tray Rule (EOR)
Here we enter the SQL command (if using SQL db connector) which will output the data to a MSSQL database.- Run EOR from the menu system
- Enter a EOR code (for everyone's sanity, name it something similar to the DOR code)
- Complete the form as per previous details ensuring you use the same Message Group as the DOR.
- In our example, our Type is "SQL db connector" and we use a stored procedure that the supplier helped setup along with the XML that will be sent to our database table.
- Be sure to use the same XET code and that the "Active" checkbox is ticked.
- Store/save your EOR
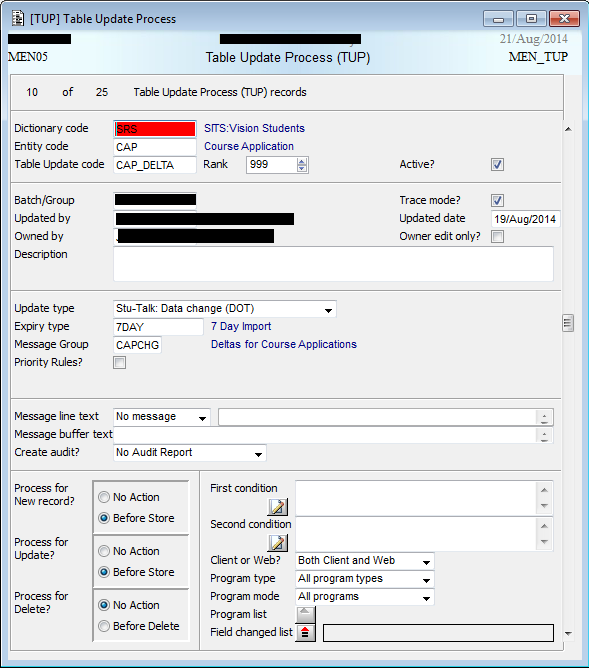
- Setting up the Table Update Process (TUP)
I always think of this as the trigger but it's required for your TOTs.- Run TUP from the menu system
- Enter the relevant dictionary and entity
- For table update code enter one similar to the EOR and DOR codes used earlier.
- Our "update type" will be DOT records
- Specify the "Message Group" you have been using for this process.
- Ensure that "process for new record" and "for update" are set to "Before Store"
- We weren't doing anything with the deletes for the time being
- Store/save your TUP
- Setting up the monitors
- Log in to your application server and create the shortcuts to run the monitors (this is as per our development environment)
- The DOT Monitor should have a shortcut similar to the following:D:\Applications\siapp\vision\dev\uniface\bin\uniface.exe /asn=d:\applications\siapp\vision\dev\adm\svrside_batch.asn stutalk usr_code=«your_user_code» smg_code=CAPCHG xpt_code=7day tracemess=3 limit=600 dot
- The EOT Monitor should have a shortcut similar to the following:D:\Applications\siapp\vision\dev\uniface\bin\uniface.exe /asn=d:\applications\siapp\vision\dev\adm\svrside_batch.asn stutalk usr_code=«your_user_code» smg_code=CAPCHG xpt_code=7day tracemess=3 limit=600 eot
- The TOT Monitor should have a shortcut similar to the following:D:\Applications\siapp\vision\dev\uniface\bin\uniface.exe /asn=d:\applications\siapp\vision\dev\adm\svrside_batch.asn stutalk usr_code=«your_user_code» smg_code=CAPCHG xpt_code=7day tracemess=3 limit=600 tot
- Run the monitors in order of DOT, EOT and TOT
- Your target database table should now be populated...
- » Read the below "Testing" steps if you aren't getting a result :)
- Log in to your application server and create the shortcuts to run the monitors (this is as per our development environment)
Testing: Manual export of XET
- Run the relevant screen (in our demo this is Application Clearance Decision (ACD))
- Go to File > Export...
- Type XET as the Data format
- Double-click in the Template field to see relevant XETs (in our demo, this will only display XETs relevant to CAP)
- Specify a destination table
- OK to create/overwrite
Testing: XET is not available as an export format?
- Bring up the Data Exchange Format (DEF) screen
- Enter "XET" as the Exchange code
- Enter "XML Exchange Format" for the format name
- Under Exchange type select "XML Exchange".
- Store/Save
Testing: Monitoring the monitors
Some useful tools:
- Stu-Talk Monitor Details (SMD): The SITS application audit giving details on each process.
- Stu-Talk Monitor Process (SMP): Counts the DOTs with date range as parameters.
- Stu-Talk Monitor Summary (STMS): Specify a SMG, date range and it will give you an overview of the DOT, EOT, TOT, TIN, DIN run.
Testing: No records are being processed despite relevant ones existing and all monitors run
I would get this issue if I cloned an existing process (released an existing one, made changes, stored it as a new one)
- Check the DOT for records that will be output.
- Check that DRE contains the rules for the DOR code you are using.
- Check that an ERE exists relating to the EOR code you are using.